DECLARE
l_item_tbl_typ ego_item_pub.item_tbl_type;
x_item_tbl_typ ego_item_pub.item_tbl_type;
x_return_status VARCHAR2 (100);
x_msg_count NUMBER;
x_message_list error_handler.error_tbl_type;
BEGIN
fnd_global.apps_initialize (11224
, 20634
, 401
);
l_item_tbl_typ (1).transaction_type := ego_item_pub.g_ttype_update;
l_item_tbl_typ (1).inventory_item_id := 646;
l_item_tbl_typ (1).organization_id := 103;
l_item_tbl_typ (1).pick_components_flag := 'Y';
ego_item_pub.process_items (p_api_version => 1.0
, p_init_msg_list => fnd_api.g_false
, p_commit => fnd_api.g_true
, p_item_tbl => l_item_tbl_typ
, x_item_tbl => x_item_tbl_typ
, p_role_grant_tbl => ego_item_pub.g_miss_role_grant_tbl
, x_return_status => x_return_status
, x_msg_count => x_msg_count
);
DBMS_OUTPUT.put_line ('x_return_status : ' || x_return_status);
error_handler.get_message_list (x_message_list);
FOR i IN 1 .. x_message_list.COUNT
LOOP
DBMS_OUTPUT.put_line (x_message_list (i).MESSAGE_TEXT);
END LOOP;
COMMIT;
END;
===============================================================
SET SERVEROUTPUT ON
DECLARE
l_item_tbl_typ ego_item_pub.item_tbl_type;
x_item_table ego_item_pub.item_tbl_type;
x_inventory_item_id mtl_system_items_b.inventory_item_id%TYPE;
x_organization_id mtl_system_items_b.organization_id%TYPE;
x_return_status VARCHAR2 (1);
x_msg_count NUMBER (10);
x_msg_data VARCHAR2 (1000);
x_message_list error_handler.error_tbl_type;
BEGIN
--Setting FND global variables.
--Replace MFG user name with appropriate user name.
fnd_global.apps_initialize (11224
, 20634
, 401
);
--FIRST Item definition
l_item_tbl_typ (1).transaction_type := 'UPDATE'; -- Replace this with 'UPDATE' for update transaction.
l_item_tbl_typ (1).inventory_item_id := 646;
l_item_tbl_typ (1).organization_id := 103;
l_item_tbl_typ (1).pick_components_flag := 'N';
DBMS_OUTPUT.put_line ('=====================================');
DBMS_OUTPUT.put_line ('Calling EGO_ITEM_PUB.Process_Items API');
ego_item_pub.process_items (p_api_version => 1.0
, p_init_msg_list => fnd_api.g_true
, p_commit => fnd_api.g_true
, p_item_tbl => l_item_tbl_typ
, x_item_tbl => x_item_table
, x_return_status => x_return_status
, x_msg_count => x_msg_count
);
DBMS_OUTPUT.put_line ('==================================');
DBMS_OUTPUT.put_line ('Return Status ==>' || x_return_status);
IF (x_return_status = fnd_api.g_ret_sts_success)
THEN
FOR i IN 1 .. x_item_table.COUNT
LOOP
DBMS_OUTPUT.put_line ('Inventory Item Id :' || TO_CHAR (x_item_table (i).inventory_item_id));
DBMS_OUTPUT.put_line ('Organization Id :' || TO_CHAR (x_item_table (i).organization_id));
END LOOP;
ELSE
DBMS_OUTPUT.put_line ('Error Messages :');
error_handler.get_message_list (x_message_list => x_message_list);
FOR i IN 1 .. x_message_list.COUNT
LOOP
DBMS_OUTPUT.put_line (x_message_list (i).MESSAGE_TEXT);
END LOOP;
END IF;
DBMS_OUTPUT.put_line ('==================================');
EXCEPTION
WHEN OTHERS
THEN
DBMS_OUTPUT.put_line ('Exception Occured :');
DBMS_OUTPUT.put_line (SQLCODE || ':' || SQLERRM);
DBMS_OUTPUT.put_line ('=====================================');
END;
Wednesday, October 15, 2014

Monday, October 13, 2014
Open or Close Periods in R12
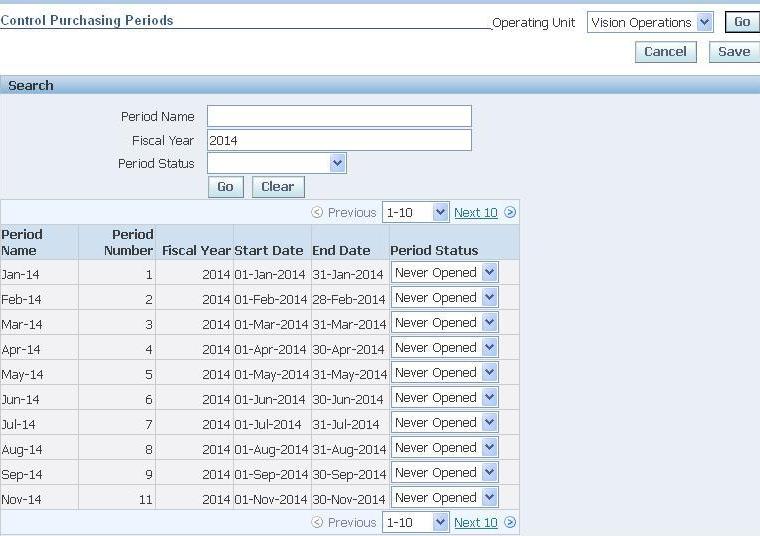
Purchasing Periods
1. Navigate to Purchasing SuperUser->Setup->Financials->Accounting->Control Purchasing Periods , then enter the Fiscal year and click Go button.
(If it prompts for selecting Operating Unit,select it and click Go button.)
2. Then open the periods by changing the Period Status and click on Save button.
Payables Period
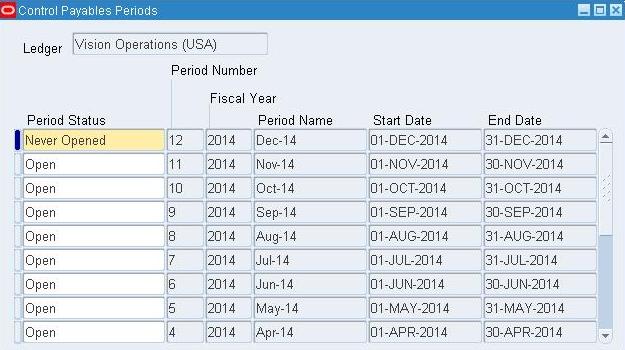
1. Navigate to Payables Super User or Payable Manager->Accounting->Control Payables Periods , then open the periods by changing the Period Status and click on Save button.
General Ledger Periods
1. Navigate to General Ledger Super User->Setup->Open/Close, then the Ledger and click find.
2. Now open the required periods by clicking “Open Periods” button,select the required period as Target Period and click Open button.

Inventory Periods
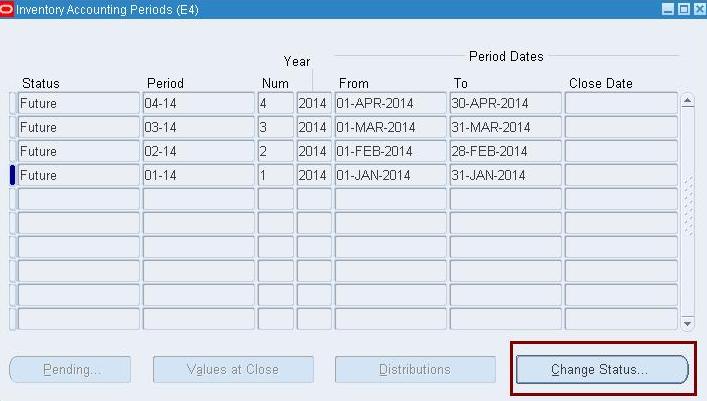
1. Navigate to Inventory SuperUser->Accounting Close Cycle->Inventory Accounting Periods and select the Inventory Org from LOV.
2. Select the period to be opened and click on Change Status button.
References:
Tuesday, June 24, 2014
Inventory Transaction data flow
• MTL_TRANSACTIONS_INTERFACE: This is the interface point between non-Inventory applications and the Inventory transaction module. The Transaction Manager concurrent program polls this table at a user-specified process interval and submits the transaction workers to process them. Processing consists of data derivation, validation, and transfer of records from MTL_TRANSACTIONS_INTERFACE, MTL_TRANSACTION_LOTS_INTERFACE, and MTL_SERIAL_NUMBERS_INTERFACE into their respective TEMP tables, from where they are processed by the transaction processor.
• MTL_MATERIAL_TRANSACTIONS_TEMP: This table is the gateway for all material transactions. Records are processed from this table into Inventory through the transaction processor. All Inventory transaction forms write directly to this table. Outside applications must write transaction records to MTL_TRANSACTSIONS_INTERFACE TXN Processor makes use of TXN worker to process the transactions from MTL_TRANSACTIONS_INTERFACE to MTL_MATERIAL_TRANSACTIONS_TEMP and from MTL_MATERIAL_TRANSACTIONS_TEMP to MTL_MATERIAL_TRANSACTIONS..
• MTL_MATERIAL_TRANSACTIONS: This table stores a record of every material transaction or cost update performed in Inventory. Records are inserted into this table either through the transaction processor or by the standard cost program. The primary key is TRANSACTION_ID.
• MTL_TRANSACTION_ACCOUNTS: This table holds the accounting information for each material transaction in MTL_MATERIAL_TRANSACTIONS. Oracle Inventory uses this information to track the financial impact of your quantity moves.
Read more: http://functionalguy.blogspot.com/2010/05/inventory-transaction-data-flow.html#ixzz35ZeMJ7oK
Monday, June 23, 2014
How to get details about patch applied in Oracle Applications by OAM & SQL?
There are some tables in oracle apps (AD tables especially) involved when applying patches.
Some of them are very useful when we need specific information about patch already applied.
I will show the main tables and afterwards some handy related SQL’s to retrieve patch applied details and how we can also get all this information via OAM.
AD_APPLIED_PATCHES – The main table when we are talking about patches that applied in Oracle Apps.
This table holds information about the "distinct" Oracle Applications patches that have been applied.
If 2 patches happen to have the same name but are different in content (e.g. "merged" patches), then they are considered distinct and this table will therefore hold 2 records (eTRM).
I also found that if the applications tier node is separate from the concurrent manager node, and the patch applied on both nodes, this table will hold 2 records, one for each node.
AD_PATCH_DRIVERS – This table holds information about all patch drivers included in specific patch.
For example if patch contain only one unified driver like u[patch_name].drv then ad_patch_drivers will hold 1 record.
On the other hand, if patch contain more than 1 driver, for example d[patch_name].drv and c[patch_name].drv, this table will hold 2 records.
AD_PATCH_RUNS – holds information about each execution of adpatch for a specific patch driver.
In case a patch contains more than one driver, this table will hold a record for each driver.
This table also holds one record for each node the patch driver has been applied on (column APPL_TOP_ID).
AD_PATCH_RUN_BUGS – holds information about all the bugs fixed as a part of specific run of adpatch.
AD_BUGS – this table holds information about all bug fixes that have been applied.
We have 2 options to view applied patch information:1) via OAM – Oracle Applications Manager
2) Via SQL queries
With OAM it’s easy and very intuitive, from OAM site map -> “Maintenance” tab -> “Applied Patches” under Patching and Utilities.

Search by Patch ID will get all information about this patch; In addition, drill down by clicking on details will show the driver details.

For each driver we can use the buttons (Timing Details, Files Copied, etc.) to get more detailed information.
With SQL we can retrieve all the above information, sometimes more easily.
For example: How to know which modules affected by specific patch?
With OAM:
1) search patch by Patch ID
2) click on Details
3) For each driver click on “Bug Fixes” and look on product column.
With SQL:
Run the following query, it will show you all modules affected by specific patch in one click…
select distinct aprb.application_short_name as "Affected Modules"
from ad_applied_patches aap,
ad_patch_drivers apd,
ad_patch_runs apr,
ad_patch_run_bugs aprb
where aap.applied_patch_id = apd.applied_patch_id
and apd.patch_driver_id = apr.patch_driver_id
and apr.patch_run_id = aprb.patch_run_id
and aprb.applied_flag = 'Y'
and aap.patch_name = '&PatchName';
Another SQL will retrieve basic information regarding patch applied, useful when you need to know when and where (node) you applied specific patch:
select aap.patch_name, aat.name, apr.end_date
from ad_applied_patches aap,
ad_patch_drivers apd,
ad_patch_runs apr,
ad_appl_tops aat
where aap.applied_patch_id = apd.applied_patch_id
and apd.patch_driver_id = apr.patch_driver_id
and aat.appl_top_id = apr.appl_top_id
and aap.patch_name = '&PatchName';
To check if specific bug fix is applied, you need to query the AD_BUGS table only.
This table contains all patches and all superseded patches ever applied:
select ab.bug_number, ab.creation_date
from ad_bugs ab
where ab.bug_number = '&BugNumber';
For any question or additional information you are welcome to leave a comment...
References:
http://oracle-apps-dba.blogspot.com/2007/10/how-to-get-details-about-patch-applied.html
Some of them are very useful when we need specific information about patch already applied.
I will show the main tables and afterwards some handy related SQL’s to retrieve patch applied details and how we can also get all this information via OAM.
AD_APPLIED_PATCHES – The main table when we are talking about patches that applied in Oracle Apps.
This table holds information about the "distinct" Oracle Applications patches that have been applied.
If 2 patches happen to have the same name but are different in content (e.g. "merged" patches), then they are considered distinct and this table will therefore hold 2 records (eTRM).
I also found that if the applications tier node is separate from the concurrent manager node, and the patch applied on both nodes, this table will hold 2 records, one for each node.
AD_PATCH_DRIVERS – This table holds information about all patch drivers included in specific patch.
For example if patch contain only one unified driver like u[patch_name].drv then ad_patch_drivers will hold 1 record.
On the other hand, if patch contain more than 1 driver, for example d[patch_name].drv and c[patch_name].drv, this table will hold 2 records.
AD_PATCH_RUNS – holds information about each execution of adpatch for a specific patch driver.
In case a patch contains more than one driver, this table will hold a record for each driver.
This table also holds one record for each node the patch driver has been applied on (column APPL_TOP_ID).
AD_PATCH_RUN_BUGS – holds information about all the bugs fixed as a part of specific run of adpatch.
AD_BUGS – this table holds information about all bug fixes that have been applied.
We have 2 options to view applied patch information:1) via OAM – Oracle Applications Manager
2) Via SQL queries
With OAM it’s easy and very intuitive, from OAM site map -> “Maintenance” tab -> “Applied Patches” under Patching and Utilities.

Search by Patch ID will get all information about this patch; In addition, drill down by clicking on details will show the driver details.

For each driver we can use the buttons (Timing Details, Files Copied, etc.) to get more detailed information.
With SQL we can retrieve all the above information, sometimes more easily.
For example: How to know which modules affected by specific patch?
With OAM:
1) search patch by Patch ID
2) click on Details
3) For each driver click on “Bug Fixes” and look on product column.
With SQL:
Run the following query, it will show you all modules affected by specific patch in one click…
select distinct aprb.application_short_name as "Affected Modules"
from ad_applied_patches aap,
ad_patch_drivers apd,
ad_patch_runs apr,
ad_patch_run_bugs aprb
where aap.applied_patch_id = apd.applied_patch_id
and apd.patch_driver_id = apr.patch_driver_id
and apr.patch_run_id = aprb.patch_run_id
and aprb.applied_flag = 'Y'
and aap.patch_name = '&PatchName';
Another SQL will retrieve basic information regarding patch applied, useful when you need to know when and where (node) you applied specific patch:
select aap.patch_name, aat.name, apr.end_date
from ad_applied_patches aap,
ad_patch_drivers apd,
ad_patch_runs apr,
ad_appl_tops aat
where aap.applied_patch_id = apd.applied_patch_id
and apd.patch_driver_id = apr.patch_driver_id
and aat.appl_top_id = apr.appl_top_id
and aap.patch_name = '&PatchName';
To check if specific bug fix is applied, you need to query the AD_BUGS table only.
This table contains all patches and all superseded patches ever applied:
select ab.bug_number, ab.creation_date
from ad_bugs ab
where ab.bug_number = '&BugNumber';
For any question or additional information you are welcome to leave a comment...
References:
http://oracle-apps-dba.blogspot.com/2007/10/how-to-get-details-about-patch-applied.html
Thursday, May 8, 2014
Formatting Date in Oracle XML(BI) Publisher
We can format dates in BI Publishes in the following three different ways,
1. Formatting Date using Microsoft Word’s native date format mask.
2. Formatting Date using Oracle’s format-date function.
3. Formatting Date using Oracle’s abstract date format masks.
4. Format with Calendar.
Lets me now explain little details about the above three ways, and below is the XML I am going to use in the below examples,
 1. Formatting Date using Microsoft Word’s native date format mask?
In the BI Publisher Properties window, select type as Date and select the format from the drop down box.
 Here is the output sample of all the three types of date’s we had in the XML. Format I selected is
DD-MM-YY.
 2. Formatting Date using Oracle’s format-date function.
format-date() is an inbuilt function in BI Publisher.
Syntax:

In the above syntax MASK is an optional parameter. We will see more details about MASK later in this post.
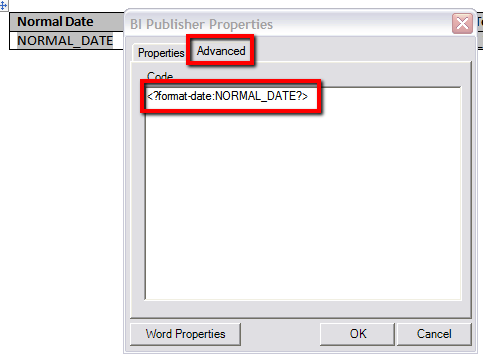
To use this format-date function, under the BI Publisher Properties window -> keep type as Regular Text -> click on Advanced tab –> call format-date function with the tag name. (For time being we will not pass the MASK parameter.)
 Here is the output sample of all the three types of date’s we had in the XML.

?> function. - See more at: http://flexfields.blogspot.ae/2011/01/bi-publisher-formatting-date.html#sthash.LrUuM9zp.dpuf3. Formatting Date using Oracle’s abstract date format masks.1. Formatting Date using Microsoft Word’s native date format mask.
2. Formatting Date using Oracle’s format-date function.
3. Formatting Date using Oracle’s abstract date format masks.
4. Format with Calendar.
Lets me now explain little details about the above three ways, and below is the XML I am going to use in the below examples,

In the BI Publisher Properties window, select type as Date and select the format from the drop down box.

DD-MM-YY.

format-date() is an inbuilt function in BI Publisher.
Syntax:

In the above syntax MASK is an optional parameter. We will see more details about MASK later in this post.
To use this format-date function, under the BI Publisher Properties window -> keep type as Regular Text -> click on Advanced tab –> call format-date function with the tag name. (For time being we will not pass the MASK parameter.)

3. Formatting Date using Oracle’s abstract date format masks.
In this section we will seeing various MASK parameters that can be passed to MASK’
In this section we will seeing various MASK parameters that can be passed to MASK’
In this section we will seeing various MASK parameters that can be passed to

Out of box we have the following MASK available for various format of dates,
Mask Constant Output
SHORT 1/26/11
MEDIUM Jan 26, 2011
LONG Wednesday, January 1, 2011
SHORT_TIME 1/26/11 8.10PM
MEDIUM_TIME Jan 26, 2011 8.10PM
LONG_TIME Wednesday, January 1, 2011 8.10PM
SHORT_TIME_TZ 1/26/11 8.10PM GMT
MEDIUM_TIME_TZ Jan 26, 2011 8.10PM GMT
LONG_TIME_TZ Wednesday, January 1, 2011 8.10PM GMT
The default MASK constant is MEDIUM.
In order to user these abstract’s you need to have your XML date data in canonical format as,
YYYY-MM-DDThh:mm:ss(+/-)HH:MM
(For example check out DATE_UTC tag value in the above XML.)
Here,
YYYY is the year
MM is the month
DD is the date
T is the separator between the date and time component
hh is the hour in 24-hour format
mm is the minutes
ss is the seconds
(+/-)HH:MM is the time zone offset from Universal Time (UTC) or Greenwich Mean Time
Here is the output for our XML data using the MEDIUM_TIME mask,

This is because of the time zone offset –08:00.
Where this timezone offset is nothing but, the time zone difference of the date that we passed in the XML with respect to GMT. So BI Publisher will automatically understand the timezone of the XML data, and print/convert it as per the BI Publisher Local Server time.
How to get Time zone offset of the data?
Ok now we know its important to pass the time zone offset in the XML data to use the MASK. Lets see how to get them in the XML data,
First Option:
If your data source is a data definition file, then no need to worry, the standard BI Publisher data definition engine by default will give the data in the canonical format with time zone offset. So you are good. No need of any extra coding.
If you do not want the template to change the date as per the time zone then, user the TO_CHAR function to print without the time zone offset. So that template engine will not modify the date as per the server time zone.
Second Option:
Lets say your data source is an RDF file. In that case use TO_CHAR function in your SQL query and bring the data in required canonical format.
Third Option:
Lets say, you do not have control over the data source. You have only access to the template and know what will be the time zone of the data that is going in come in the XML.

Now that we had seen different types of formatting dates, let finally see how to use the above formats with various calendars.

- GREGORIAN
- ARABIC_HIJRAH
- ENGLISH_HIJRAH
- JAPANESE_IMPERIAL
- THAI_BUDDHA
- ROC_OFFICIAL (Taiwan)
I think, I had covered all the date formatting techniques in BI Publisher. If you feel I had missed anything or would like to explain some specific example, feel free to put on the comments.
References:
Monday, May 5, 2014
TOAD - Privileges required for Debugging Oracle Procedure
The following privileges are required for debugger:
1. GRANT ALTER SESSION TO user_name;
2. GRANT CREATE SESSION TO user_name;
3. GRANT EXECUTE ON DBMS_DEBUG to user_name;
Minimum requirements to debug other than your own procedures, functions, and packages:
1. GRANT ALTER ANY PROCEDURE TO user_name; (compile)
2. GRANT CREATE ANY PROCEDURE TO user_name; (edit / save)
The following additional privileges are required for debugger inversion 10g and any version released after that:
1. GRANT DEBUG ANY PROCEDURE TO user_name;
2. GRANT DEBUG CONNECT SESSION TO user_name;
Also, verify that the DBMS_DEBUG package in the sys schema is valid.
After the above, EXIT and RESTART Toad.
References:
Subscribe to:
Posts (Atom)